This is the complete guide to Remove Factory Reset Protection (FRP) and Bypass Google Account for your iQOO 9T. If you have reset your phone and now you are at the initial setup of your phone and it is now asking for the Gmail ID and Password.
What If?
In case you don’t know about the Gmail account ID & Password which was previously synced in your phone. In other words you maybe bought a secondhand phone from someone and as a result now you’ve stuck on this locked screen.
With a message: “This device was reset. To continue, sign in with a Google Account that was previously synced on this device.”
The Main Problem:
The problem is many people are selling or trading phones with (Factory Reset Protection) FRP enabled and this makes trouble for the next person.
And if you want to reset your phone with FRP enabled, this is necessary to submit not only “User Name” but also “Password” for the previous Google Account that was registered with the phone.
Thereupon the only thing you can do now is to Disable the FRP and remove Google Account as well. Fortunately we have found a way to do this with some simple steps. Moreover this guide works for iQOO 9T FRP Bypass the same method works for all three devices.
Before performing this FRP bypass iQOO 9T it is necessary your phone battery must be charged at least 85%. You only need a WiFi connection for this procedure not any Laptop, OTG Cable or PC.
Easy Steps to FRP Bypass iQOO 9T Google Account and Remove Factory Reset Protection:
Step 1: Restart your phone.
Step 2: Select your Home Language > Connect to the WiFi network.
Step 3: At “About Your Privacy” page tap on Accept and Continue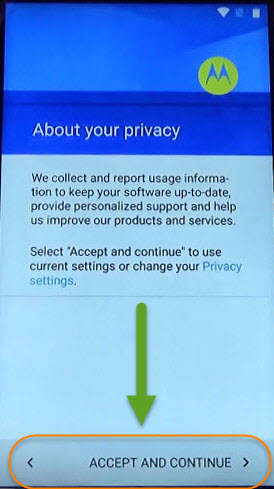
Step 4: After that you’ll be having the “Verify Your Google Account” screen.
Step 5: Now here “< Go back” to your “Select WiFi network” page and scroll down to select “Add another network”.
Step 6: Here on the Network name write “1234” and push it long to have access to the “CUT, COPY and SHARE” options. And then tap on “SHARE”.
- Just after tapping on SHARE you’ll see different Apps on your phone screen. Like Bluetooth, Copy to clipboard, Drive, Gmail, Hangouts, Messenger etc.

Step 7: Press Longer on “Gmail” > tap on Notifications > App Settings > here click on “:” the top right corner of your screen. Then tap Manage Accounts > Continue.
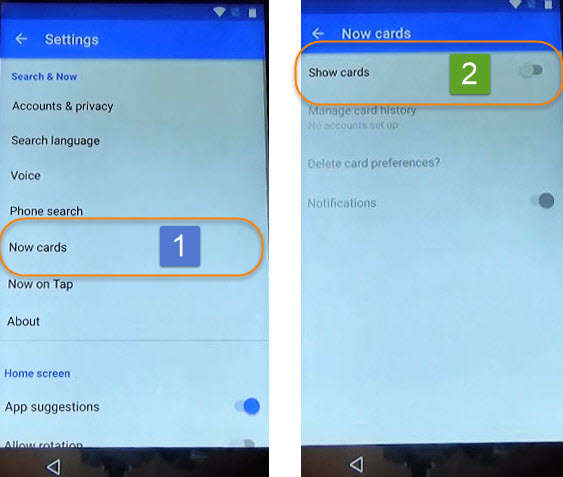
Step 8: Now you’ve access to the “SETTINGS” of your iQOO 9T 5G phone. Now scroll down and go to “Google” > Search & Now
- Now Cards > and enable “Show Cards” at the last.
Step 9: Tap “No Thanks” on bottom left corner of your screen. After that on the Search Bar type Chrome and tap on the “Chrome Browser”.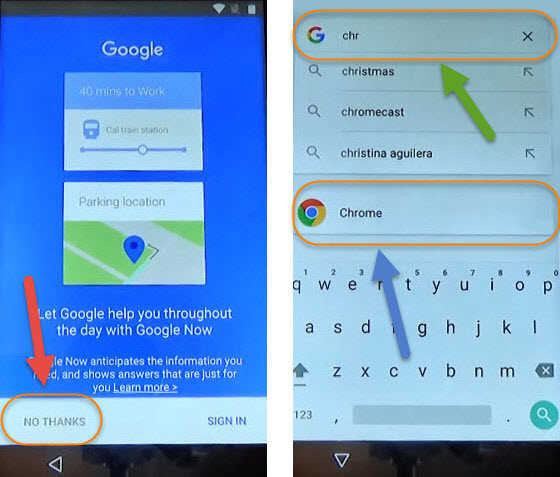
Last FIVE STEPS to Completely Remove FRP Protection from iQOO 9T:
1st: In Chrome Browser tap “Accept and Continue” > “No Thanks”, Now you have access to the Internet. Type “TechOxygen Test DPC 2.0.6 APK latest version” on the Search bar and search.
2nd: Open result with “Techoxygen.com”
- Scroll down tap on “Download”

3rd: After download done open the download folder then tap on “If it shows Installed Blocked message don’t panic just tap on Settings scroll down and enable Unknown Sources and try to install the app again.
4th: When the app installed, Open it and you’ll have Setup Management page here it will show you 2 Options
- Setup up Managed profile.
- Set up device owner.
- Select the 2nd one and tap Set UP >>.

5th: After that Set up your device screen will appear with the message: To continue setting up your device, You’ll need to Encrypt it…
- Tap on “Encrypt” and connect your phone to the charger and tap on Encrypt Phone >> Encrypt Phone again. Wait until your phone restarts.

- Once your phone restarts, Just do all the Initial setup like, Select your home language, connect to the WiFi network etc.
- At the last steps you’ll see Test DPC application just tap on “SET UP” and done other notifications. When you’ll get “Just a Sec…” screen now here “Power Off” your phone.

- When you done that, Power On your iQOO 9T phone again and you’ll have complete access to your phone.
 Just complete the initial settings and you will have the HOME SCREEN back again.
Last Words:
Bingo!! You’ve successfully Bypass your device and now you won’t see the Google Account Verification Page anymore at the startup of your phones initial setup.
Fortunately this same guide works for iQOO 9T Android smartphone. If you need any help regarding this, please comment below.

