Bypass FRP lock from Samsung F23 Android 11 device without PC in 2022. Using this easy-to-follow method, you can remove the FRP lock from your phone. This is free of cost method; you don’t need to buy any FRP tool. And you also don’t need to pay for any premium service to bypass Google account verification from your android device.
If you are the one who forgets the Gmail ID and Password of the Google Account. Which is connected to your Android 11 device and therefore facing FRP lock screen. As a result, you are looking for a solution to remove the FRP lock from Samsung Galaxy F23 5G and to start using your phone again without any Google account lock. Then, luckily you are at the right place.
There is no need to worry about it, as you are not the only one who is facing this problem. Moreover, in this article, we will show you a step-by-step guide to unlock Google account and Factory Reset Protection, (FRP LOCK) from your Samsung F23 5G phone.
Factory Reset Protection in Samsung Galaxy F23 5G Android 11 Device:
A little information regarding “Factory Reset Protection” and Google Account Verification in Android devices. The real question is, why are you facing this problem?
Well, it is not difficult to understand, as, in simple words, it is for the security of our phone’s important data. FRP works as a security shield that helps to prevent any unnecessary access to your phone. Therefore, when you Factory Reset or Hard Reset an Android phone, the FRP lock automatically starts to protect the data.
On the other hand, we all know the importance of Lock Screen Security in our smartphones. As we don’t want our friends, family, or any stranger to get into our phone’s data without our permission.
That’s the reason why we use a Pattern Lock, Fingerprint Scanner, or Face ID lock into our Android phone. Although, in the worst-case scenario, if someone steals your phone. Then your pictures, messages, and other important data will be secured because of the Screen lock protection.
However, if you are in a situation, in which you’re not able to use your phone because of the Screen lock. And you don’t remember the password, PIN code, or Pattern lock of your phone. In this case, we usually perform a “Hard Reset” which eventually removes the Screen lock.
As a result, it will lead your phone to the “Factory Reset Protection”. In order to bypass this screen, you have to provide the correct Gmail ID and Password of your Google Account which is synced with your Android phone.
Can you bypass Google account verification from Samsung Galaxy F23 in 2022 without PC?
Fortunately, you can easily solve this problem and prevent smashing your phone against the wall due to the unbearable frustration. All that you need is to follow the step-by-step guide to Bypass Google account verification from your Samsung F23 Android 11 phone.
Bypassing Google Account is quite an easy task. You will have to follow each step carefully, and we are providing a clear demonstration for each step using an image. That will help you to understand the guide more easily and you can always contact us for any help during the process.
Samsung F23 Android 11 FRP Bypass Without PC and SIM Card Step-by-step Guide:
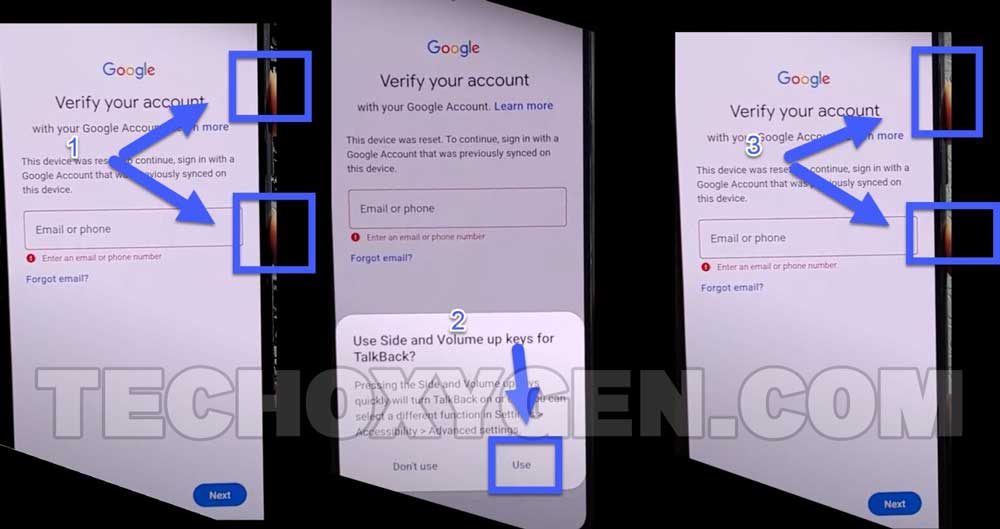
1. Power on your Samsung Galaxy device
- Connect it to a WiFi network and Press Next.
- When you see “Google Verify your account” screen.
- Push the Volume UP + Side Key together to activate the Talkback.
- When you see, “Use Side and Volume key..” notificaiton, tap on the USE option.
- Then again push the Volume UP + Side key at the same time.
- Doing so will turn on the Talkback in your Samsung Galaxy device.
2. Draw a reverse “L” on your screen.
- Once a notification appears, tap twice on “While using the app”.
- Then tap twice on “Use voice commands”.

3. When you see “Welcome to Talkback” screen, say “Google Assistant” on the microphone of your Samsung Phone.
- After that, push and hold Volume UP + Side key to turn off the talkback and click Next.
- Bixby welcome screen appears, tap on Sign in.

4. Enter the Email and Password of your Samsung Account and Sign in with it.
(You can also create a new account if you don’t have it, then simply sign in with it.)
- Agree to the terms and conditions and then tap on Continue.

5. Tap on “Discover Icon” and select “More ways to use Bixby”.
- Then swipe up and open “YouTube”.

6. Select the first option “In YouTube play yoga videos”.
- Tap on the top right corner of your Samsung Galaxy screen.
- Inside account go to Settings.

7. Go inside the About settings.
- Then, click on ‘YouTube Terms of Service’.
- Doing so will open Chrome browser in your phone just click on “Accept and Continue”.

Important Step to download FRP unlock Apk:
8. Select the URL bar of Chrome, then type and enter this URL: tinyurl.com/Files-FRP

- Scroll down and tap on “Click to open Alliance Shield X”.

9. Agree to the legal information page.
- Alliance Shiled applicaiton will appear on your Samsung screen, tap on Install button.
- To install this app, you first need to sign in to your Samsung account.
- Enter the Email and Password of your Samsung account and Sign in.

10. After Signing in, Cancel the Faster way to Sign in option.
- Then, download the Alliance Shiled application.
- Wait for it to complete the downloading.
- Then OPEN the application into your Samsung phone.
11. Install and open the Alliance Shield application.

Alliance Shield X App Installation Steps:
12. Welcome page of Alliance app will appear. Tap on NEXT.
- Register a new Alliance account if you don’t have it already.
- Then, Sign in to that account into your phone.
- Type any name to your device and click NEXT.

13. Enable the Device Admin option.
- It will redirect you to the Device Admin page, tap on Activate.
- Once it enabled, tap on NEXT button.

14. Allow the Knox option.
- Then, It will redirect you to the KLMS Agent page. Tap on AGREE.
- After that, simply tap on NEXT button and Finish the installation.

15. Finish the installation of Alliance Shiled X.
- Go to App Manager.
- Tap on Search bar.

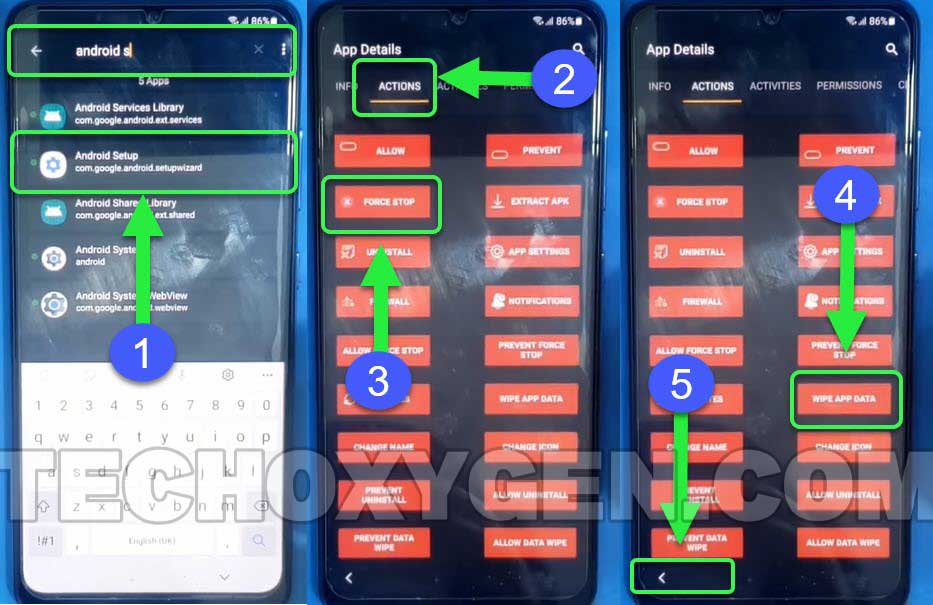
16. Type Android Setup in search bar and select “Andrios Setup” from the results.
- Then go to ACTIONS TAB.
- Tap on FORCE STOP to disable the Android Setup.
- Then, tap on WIPE APP DATA to remove stored data of Android Setup.
- After that, Go back to the APP MANAGER.
Last steps to remove Google verification lock:
17. Search for “Play Services” in search bar and select “Google Play Services” from the searches.
- Then go to ACTIONS TAB.
- Tap on FORCE STOP to disable the Google Play Services.
- Then, tap on WIPE APP DATA to remove stored data of Google Play Services.
- After that, Go back to the APP MANAGER.

18. Search for “Samsung Setup Wizard” in search bar and select “Samsung Setup Wizard” from the searches.
- Then go to ACTIONS TAB.
- Tap on FORCE STOP to disable the Samsung Setup Wizard.
- Then, tap on WIPE APP DATA to remove stored data of Samsung Setup Wizard.
- After that, tap on ACTIVITES TAB inside Alliance Shiled application.

19. Tap on first option “SecSetupWizardActivity”.
- A pop up windown will appear, tap on OPEN.
- It will redirect you to the initial setup wizard of your Samsung phone.

20. Finish the initial setup of your phone.
- Push “Home Button” from Alliance Shield X application.
- It will again redirect you to the setup wizard.

21. Complete the initial setup wizard of your Samsung phone. You will not see any Google account lock or FRP lock during the setup process.
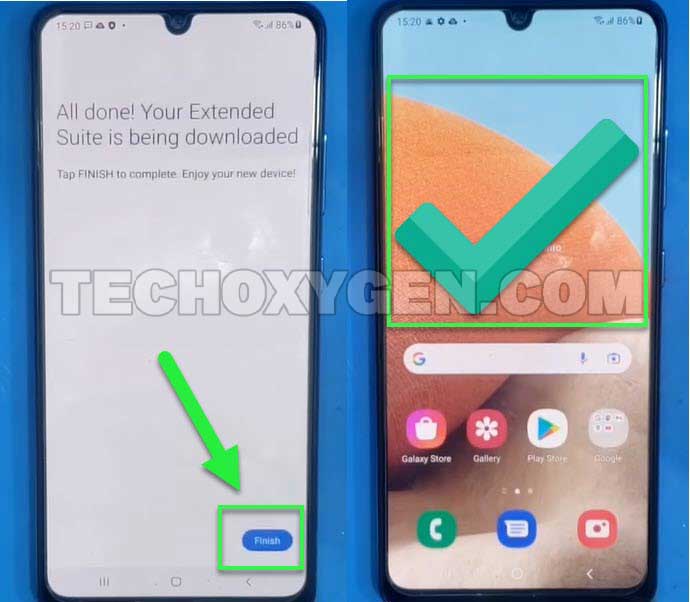
That means, the bypass Google lock and FRP lock is completed sucessfully.
Conclusion:
This is a Samsung Galaxy F23 5G Android 11 FRP Bypass guide and it is free to use. You don’t have to pay for any paid tools to remove Google account verification from Samsung F23 Android 11 smartphone. This guide will help you to not only bypass Google account but also will remove the Factory Reset Protection from your Samsung Galaxy F23 device.
If you need any help regarding this method, feel free to ask me in the comment section or you can also contact me via contact us page.


This method works for my Samsung f23 phone.
That’s great!